Monday, December 23, 2013

Grandmother's Flower Garden Quilt Progress

It is so exciting when I get to a bench mark in this quilt!!!
My first goal was to quilt from the center (where it's always best to start) to a corner.
Now, I have successfully hand quilted from one corner to another.
                               Woooowhoooo! hahahah imagine me doing a silly happy dance :)
Now to work my way from this corner to the third :) Getting it done!!!
 
 
How are you getting on with your projects??
Happy Sewing,
Melodee :)

Thursday, December 19, 2013

Super Scrappy Sunny Quilt Tutorial

Beta Testers needed! Please give this post a read over and let me know if I pass muster or not...if you are up to sewing a block and sharing with me all the better! I'll PM you my mailing address if you don't already have it :)

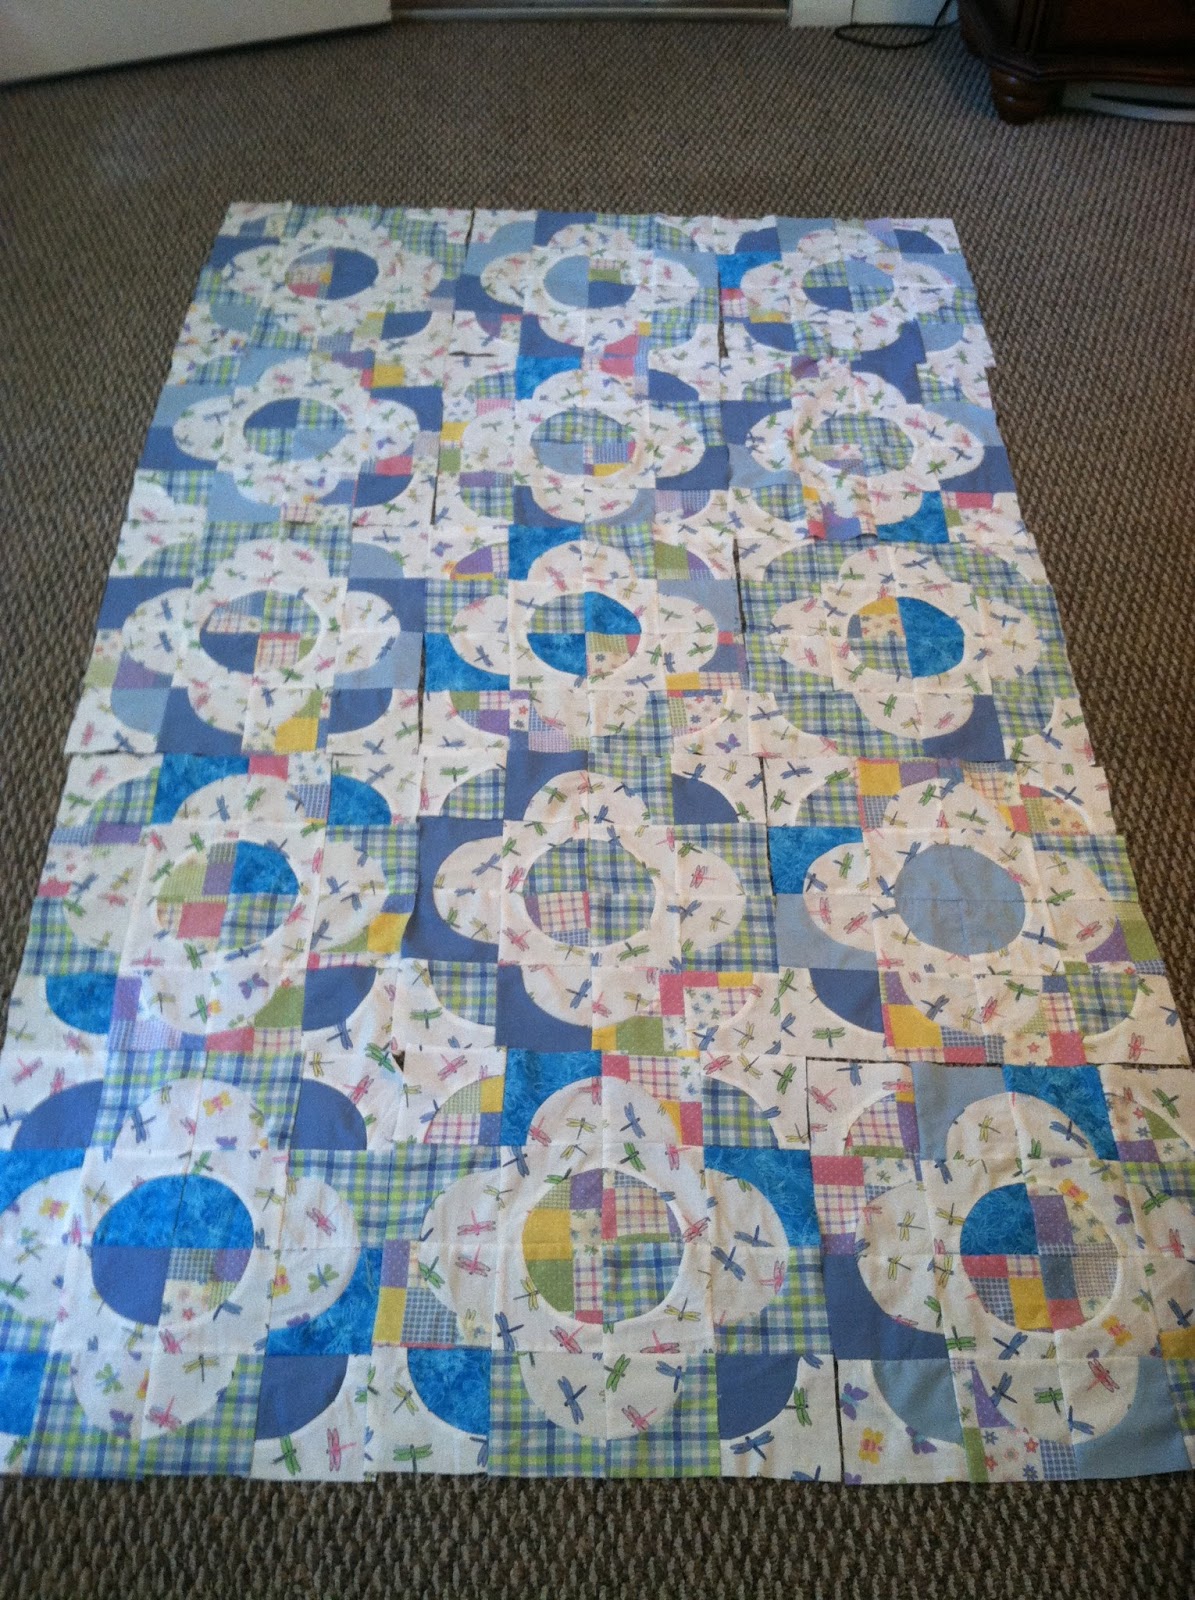
I was over on Pinterest (imagine that! ha) a while back and saw a folded up quilt in the background of a picture, yeah I'm that nit picky! I took out my sketch pad and fashioned up what I thought would be a good pattern to achieve the look of the quilt.
Now the quilt hidden in the depths of this picture was all matchy-matchy and totally not me! I decided to go the super scrappy route and .....all-la peanut butter and jelly sandwiches...!!!! here is what I came up with :)
P.S. I'd love to put a link in right here to the original picture but I can't even believe it!!! I did not pin the picture!!!! I have now spent really far too much time looking back through my likes and pinterest in general to find this picture but alas I am now saying, I give up! trust me it's out there somewhere!

I have now decided that this would be a great block to use for the Stash Bee Quilt I am participating in in 2014 :) super de doper excited!!! and I have per the rules of engagement in said Quilt Bee written what I feel are the directions to making this block.

And so we begin:

First, I decided that each "block" will contain lights and darks of varying and not too matchy prints, and that any ole print will do, going super scrappy on this one!

The block is made up of 4 units that are sewn individually then pieced together to form the one big block seen above.

To achieve this I had to cut from 8 different fabrics, 4 dark and 4 light. In the picture above you can see my darks as being the majority fabric and the light being really small triangles in each section.

So I cut:

Dark:
one 4.5 x 4.5 square
two 2.5 x 6.5 rectangles
one 2.5 x 4.5 rectangle
one 2.5 x 8.5 rectangle

Light:
one 4.5 x 4.5 square
two 2.5 x 2.5 squares

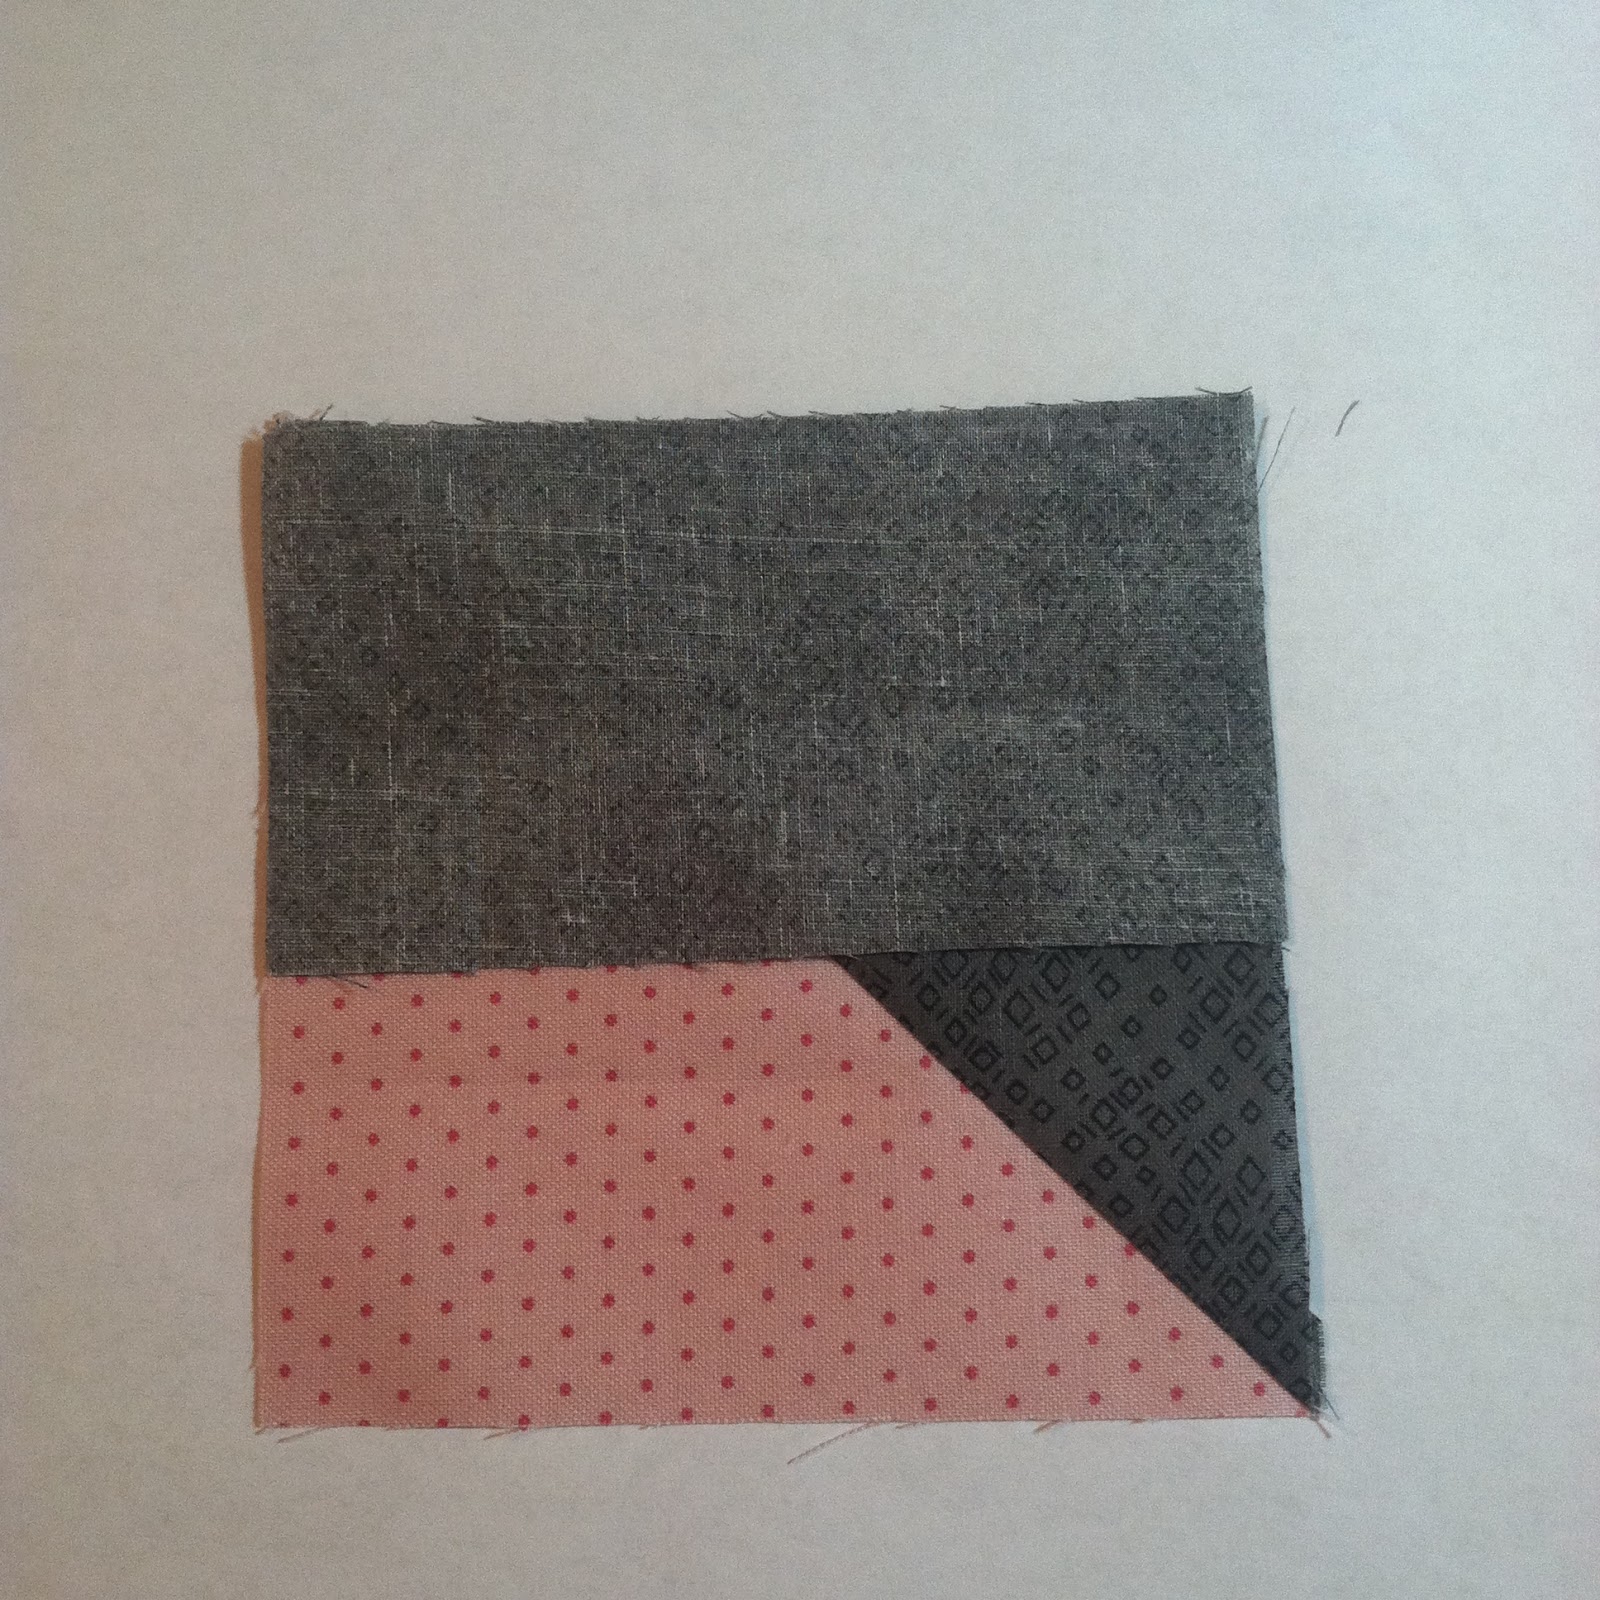
First we need to prepare a few of the blocks for making triangles. To do this I took the 4.5 x 4.5 fabrics and placed right sides together and with my Ticonderoga pencil (the best on the planet I swear!) I used my ruler and made a straight line from corner to corner on the light fabric. This will be our sewing line.
 
Now we sew along that drawn line. Literally I did a straight stitch right over the line I drew.
Now I am not a fabric waster so I have decided that the "scrap" bit that would normally be cut and maybe tossed by some would make a really nice pieced border...so I took my ruler again and drew two more lines, each one a quarter inch from the last. In my case I went to the right of center.
 
 
I then sewed, again literally right on the drawn line of the third line. I then used that center line that has not been sewn on as my cutting line.
 

I then pressed this to the dark.
And all of this left me with two similar blocks. Please note that only the 4.5 x 4.5 block will be used in the construction of this block. The smaller square is to be set aside for use later in the border :)
Now we move onto the 2.5 pieces. Taking both 2.5 x 2.5 light squares we set them onto the dark (exactly as shown below) onto the 2.5 x 8.5 and one of the 2.5 x 6.5 pieces.
 
 We then draw a diagonal line in the exact direction as shown.This ensures that the final triangle will be in the desired direction. Sew on top of this drawn line.
cut the seam allowance to 1/4 inch.
You will then need to press this seam up to make a complete rectangle. Now the blocks are all ready for final assembly. I like to lay out the blocks in their final placement to ensure that I will sew them in the correct direction.
Taking the 4.5 x 4.5 center square I place a 2.5 x 4.5 dark rectangle along the top edge and sew using a 1/4 inch scant seam.
I then press to dark.
Next, I take a 2.5 x 6.5 plain (the one without the light triangle) and sew that to the right edge. I pressed the seam out toward the 2.5 x 6.5 rectangle.
Next take the 2.5 x 6.5 piece with the light triangle on the end and sew that to the bottom. I pressed this seam out.
Finally, take the 2.5 x 8.5 with the light triangle and sew it to the far left side. I then pressed this seam out.
Our first 8.5 x 8.5 inch unit is done :) I made the other 3 units in the same exact fashion. When it came time to sew and iron the 4 pieces together I did iron the center seams  open. I felt this helped me achieve a more "flat" effect.
 
However, when I sewed the final two halves together I left the seam closed and pressed to one side.
 
And here we have I! Our first block completed for the Super Scrappy Sunny quilt :)
 
And some final words for my Hive Mates...I am ok with what ever color you choose or what ever motif you choose. you pick what you think is scrappy best!
I am also ok with a finished block size that passes the stretch test. Meaning, that when it lays flat on its own and is a wee bit off but I can pull a bit to make it 16.5 x 16.5 when I sew it all together, I am totally cool with that!
 
And lookie here! I also am totally ok with stuff just not lining up so much...check out this seam...

Zoinks! what happened there! all's good in the end...this totally passes the stretch test :)
I can't wait until March to see what rolls in!!
Any questions please ask!!
 
Happy Sewing!
Melodee :)


Saturday, December 14, 2013

Having A Charlie Brown Christmas

I've really been working hard to get lots done before the Christmas deadline...because seriously it is looming!!!

I just love these cute felt ornaments of Charlie Brown and all the Peanuts gang.

Peanuts Character Ornaments
from top left: Linus' blanket, Linus, Charlie Brown.
Second Row: Lucy, Charlie Browns Shirt, Snoopy, Ornament from Charlie Browns sad tree
Third Row: Marcie, Peppermint Patty, ReRun, Schroeder.
Fourth Row: Sally, Woodstock, PigPen


Actually I found this last year over at A little Gray but never got around to doing it. But this year I was able to finish it up...and as typical for me amp up the awesomeness just a wee bit ;)!!

Soooo...you are so excited about these and want to make some for your self?!?! well then, this link here will take you to the site where you can download the templates and find directions to make the top two rows of ornaments.

The last two rows I used the basic ornament form from the orginal template, did a google images search for "Charlie Brown characters" and tinkered around with my felt until I had what we see here :)

Hope I've inspired you to give them all a try too :)
Have a merry Christmas everyone!

Wednesday, November 20, 2013

Winter weather is here :)

***********♥********♥**************♥*******************♥************♥*******
I am a rarity it seems. I am one of those "weird" people who actually like winter. I do, I really do!

I just love the cold weather and dressing warm and eating soups and stews and making warm fires in my homes fireplace.... oh the love of the winter season!

Being a person who loves the cold I am always looking for ways to make being outside more enjoyable. Because seriously let's face it, even loving winter I am not into actually being cold!

So this year I am using my sewing talents and whipping up some pretty cool things to combat the cold and keep me and my little brood out there loving the season!

Also, I am always looking for ways to reuse, recycle, upcycle, cheapcycle, you name it cycle my way along. So lookie here what I have found!!!!


First up in the winter arsenal is the hat! I found a cute, easy, and FREE pattern to print from home and whipped up this beauty using an old and loved sweater that I frankly ruined (cotton/angora and I machined dried it all the time!) many years ago but still loved it and have worn it into submission lol. I paired the this gray sweater with an old worn out blue work t-shirt of my husbands.

The pattern is over on http://seekatesew.com . and has been pinned many many times over on Pinterest too :)

Follow this link to the tutorial :) It is called the  Snowy Day Hat

The only thing I " changed" was that I printed the pattern pieces then cut out ONLY the sides that need to be taped to each other (on pattern see "tape to front/back here") then drew out a half inch seam allowance BEFORE I cut the entire pattern out. And I also cut my strips for the braided ties to 2 inches wide.

Next up will be mittens...I found a free pattern to use old sweaters here too :) back to the sewing table I go.....

happy sewing all!
Melodee the snow loving weirdo ;)
 

Friday, July 12, 2013

what I'm working on... July 2013: scrappy drunkards path quilt

What's up in my world???...

Well, I have finally!!!! decided to do something with the fabrics I kept from my kids baby beds (cribs). And seriously I'm saying to myself it really is about time! they are 11, 10, and 7 years old for Pete's sake! lol but every move in its time I guess.

Any how, after a long Pinterest search I came up with a pattern/block that I just love and think fits my fabrics well.


I found my pattern/tutorial where else but Pinterest initially. I followed the link and it took me to where else but Moda !

lol I just love how I always seem to end up at about the same places :)

I must say that my work is so not perfect (sewn curves yikes!) but this quilt is for me the mommy and I just don't care about that! I am loving that it is coming out kinda shabby chic-ish too.

But, when I lay it all out my corners and such meet where I like them and thus everything feels right in my little world.

The other super cool part for me is that when I iron I get a waft of Dreft baby soap (what I used to wash their things as babies) and I just love the happy emotional ride I go on!

I am thinking that when I do finish this I will make a rule to only wash it in Dreft to keep that baby yummy smell :)

I have almost run out of fabric for this so while my original plan was to make 20 "flowers" (blocks) I only now have enough to make one more for a total of 16.


So, I need to decide if I want to stay with 4 rows of 3 or 4 rows of 4. Frankly I'm not really one for a squared quilt but maybe this time??? decisions decisions :)

Updates to come :)
Happy Sewing all!

Melodee


Thursday, April 25, 2013

AHHHCHOOO! tissue please

I was on Pinterest (where else right??) and saw the cutest picture of a fabric tissue holder. You know those cute little tissues that come in the ever so small but completely handy baggies...yeap those! so I pinned it :))

Well I just loved the idea and clicked the pin and guess what! no written tutorial for the thing :(

Pictures sure but no cut this and sew that kinda stuff. So, here I am! and what follows is my:

How I made a tissue holder to cutely hold a 8.6 inch x 8.3 inch baggie of tissues:


First you need to select and cut your fabrics BUT keep in mind which of these will be on the outside when all done and which will be the inside and small little trim parts you see on the tissue pull spot.


Once you have selected your desired fabric cut the outside piece 6 x 6.25 inches and the interior piece 6 x 7 inches. yes they are not even; we're doing this for a great reason!

 
Next, align both fabrics with right side together (pretty sides) along one of the 6 inch sides. We are going to sew a 1/4 inch seam.


Next, we will sew the other 6 inch side together making sure to keep that bulk of extra fabric out of the way.
 
 
This will create a pool of extra fabric on one side, this is good! we want this.


Now we turn this tube right sides out (pretty sides out) and get our tube ready to press the seams.
 
I like to turn my piece so that the seams are in the middle. And I find it easier to press my seams towards the interior (in this case the bigger (red) fabric). this helps with evening up on the next step.
 
 
Once you have your sides as even as you can get them I press that baby with tons of steam and get it as near flat as I can :) careful though, you don't want to stretch your fabric out of shape.


Now I fold the thing in half (trim ends together) and make a center crease.
 
 
Then I fold each of the edges in half meeting the trim piece to the center and pin in place. You don't want your edges to overlap but you do want them to be as close to each other as you can get.
 
 
I sew a 1/4 seam on both sides. I back tack to start and finish and I sew back and forth three times to really reinforce that center. You will be putting the most pressure at this point pulling those tissues out and you don't want anything to need fixing later on ;)


I then use my pinking shears and clean up those exposed frayed edges.

 
Finally, I  turn the case right sides out (pretty sides showing) and using a chop stick I poke the corners out and insert my tissues :) all done!
 
I sure hope my explanation does it for you. I tired to be as detailed as I could without going overboard with pictures and text. If you have any confusion please feel free to message me! I'd love to help!!
 
Until next time...happy sewing :)
 
Melodee


Wednesday, February 6, 2013

Rosie bed

As Ben Franklin said, necessity is the mother of invention...and throw in some great blogging inspiration and you get success!

I am so happy with the results of this project! You see my cute puppy there?? Yes, that one! The one who loves to sleep on the ottoman and falls off in the middle of sleeping and the one my hubby wishes would move to the floor any how???

Well, I came up with an idea to make her a doggie bed/pillow and make everyone happy.

A google search for "dog bed" landed me at www.dogundermydesk.com ...here I found a super cute and easy tutorial to make a fleece dog bed.

Now, to be completely honest I didn't exactly follow her tute to the letter. However, I did harvest her ideas and adapted them to suit my needs.

I just happened to have an old burgundy flannel flat sheet in my sewing room and I thought perfect!

So I cut a biggish hunk of the sheet off and folded it (how to do this is in the tute) to ensure I would end up with two layers. I free-hand cut a sorta circle. Opened it up and found two kinda circles. Then, I went back to the remainder sheet and cut a long strip that was 8 inches wide. I followed the tutes directions here and folded my edges over and pinned the first sorta circle to this strip and sewed. I repeated this with the second. After sewing I turned the pillow right side out.

Now, I have a kinda resolution for 2013...basically I aim to use what I have on hand-force myself if I must- before I buy anything new. So, keeping this in mind I searched my house for stuff I could stuff this bed with. And what I found was perfect!

Last year I made my hubby a T-shirt quilt. It turned out perfect! But I was left with an odd assortment of cut up knits. Why I've held onto them who knows! But in they went for this project. Also, I had an old pillow that was washed and dried but as these things go, didn't fair too well. It was all bunched up and messy. I cut the pillow open and stuffed all that mangled mess into the dog pillow. With the help of a daughter we smoshed around the dog pillows contents until it felt right. then I whip stitched closed the stuffing hole. A big plop on the floor of our new dog bed and our project is complete!!

Our Rosie is off the ottoman and not on the floor! Win win in my book :)

Happy sewing,
Melodee

Monday, February 4, 2013

Flowers in bloom quilt done!

Here is another scrap buster I just finished today :)
I began this very simple 8 inch squares quilt last year some time.
I made the quilt top (from stash material!!! yeah) and received the check fabric as a gift. I laid my two layers onto another and it sat in a pile of I need to get to that soon stuff in my sewing room (ahem...living room).
Like many of my UFO's and WIP's it sat waiting on money to buy materials to finish and how to quilt it.
I made up my mind about a week ago that I was going to do a large flower hand quilted in each block stitch.
Then, sticking with my, I must at least try to find supplies around here before I buy any more plan, I decided to use a purple cotton thread I had lying around.
Now to be honest many would not think to use this particular thread. It is, in fact, the same stuff my grandma's used to make crochet doilies and such years ago. Who cares what the stuff is intended for right?? Right! Not me! I went with it and just love it!!!

Now that this is done my plan is to do some small ---get done fast stuff cause it feels soooo rewarding to see stuff done--- stuff!!!
More later ;)
Happy sewing!
Melodee

Tuesday, January 29, 2013

Sewing progress

And here we go again ;)

I've been working hard to hand quilt this one up. I'm more than half way done!!

A couple more days should do it!

Happy sewing,
Melodee

Friday, January 25, 2013

At it again :)

I am at it again...working hard!

So happy to be hand quilting again...even if it is an idy bitty quilt.

I had all the fabric on hand so I went out today and picked up the needed batting and a quick google search for images landed me this flower motif and away I go....

I'm planning a week to quilt then bind this one.

Nothing special about the style really, just a bunch of 8 inch squares. But it is made from left over fabrics I've used in other projects...so a stash buster I guess.

Whatever you call it, it sure is fun :)

What are you working on? Bet it's cool too!!

Happy sewing,
Melodee

Saturday, January 19, 2013

Craftsy 2012 BOM end

I was going over the blocks from the Craftsy 2012 block of the month and noticed I was one short :(

After sewing up this block I now know why I put this off!!!

I am not a big fan of paper piecing and this block is no exception! But, it being part of the BOM it will be done. I'm determined!!!!

This block is sewn into quarters then together as a whole. This pic is the first and I do have the second complete. My plan is to do another quarter tomorrow and finally finish up on Monday.

Hopefully my finish will be accomplished with no major hiccups... Again paper piecing is not for me :)

Once these blocks are complete I get to line up all the blocks and get the top planned and sewn.... Then onto another top to quilt... But all that for another day ;)

Happy sewing,
Melodee

Sent from Melodee Bourdeau's iPhone

Thursday, January 17, 2013

A second life

> One of the greatest things one can do when they know how to sew is mend.
>
> I have this gray thermal shirt that I've had for years and well, it's just my favorite!
>
> Recently the sleeve ends have become tattered and just a mess.

> I decided to cut off the bad and create a new cuff. And best part is, I didn't need to buy a thing to do this.
>
> My husband goes through many a t-shirt and I took one of those cast aways and cut new cuffs and serged them on.
>
> And now I'm a happy lady who has a favorite shirt back in use :)
>
> Having a great day!!! Happy sewing!
> Melodee
>
> Sent from Melodee Bourdeau's iPhone
>

Wednesday, January 16, 2013

Chapstick Cozy

I just finished up these three super cute cozy's.

 I've had this project on my mind for while now. But wanted to wait until I had the modern ins and outs quilt done before adding more work to my super crowded sewing table...lol it's a real mess!

But...moving on...I first saw this on...where else but...Pinterest!  

I followed the tutorial (see link pasted below) in it's entirety except I used a 1.5 inch D-ring. As you can see from the picture this size worked just wonderfully for me.

I love this project. I won't go all -it's easy peasy- on you but I'm almost ready to. See the issue is really me and not the tutorial. I am a bit of a perfectionist and don't always feel bulky sewing gives me that crisp clean all lined up look that I desire. But all in all I am very pleased with the results! And it took me maybe 20 minutes to cut, interface, and sew these up!

If you like what you see follow the link and give it a try! 

Happy sewing :)
Melodee


Sent from Melodee Bourdeau's iPhone

Sunday, January 13, 2013

Done!!! Modern ins and outs

I am so happy to be posting my latest completion!!!!!!

I've named it "Modern ins and outs".

And I've made a wonky kinda label for it. Basically it's a 9 inch square folded into a triangle with the raw edges out and the turned edge whip stitched down. I love it!

What do you think??

Now on to the next project...I know just the one! Status update soon!

Happy sewing,
Melodee

Tuesday, January 8, 2013

Around the corner

So I'm not exactly sure what my exact sewing goal was for today but... I was able to finish one short side!!!!

I've rounded another corner and have one more corner to do!!
Tomorrows goal will be to get half of the second long side quilted.

I'm hoping to get the last of the outer border quilting done before this weekends warm up. Yeap! That's right!! Weather is predicted to be in the 50's!!! I will have to find some machine work to do to keep a blanket off my lap! No problem!!

It's always great to have a plan... Here's hoping life doesn't interfere ;)

Happy sewing!
Melodee

Monday, January 7, 2013

Goal met???...fail :(

Well, today's sewing goal was to complete one small (top of quilt) border.

That did not happen... I am about 2 feet too short of that goal. But, I've decided to call it an end for tonight.

Today was still a very productive day despite my sewing failure. I for one am holding to that!

Now onto bed and a good read :)

Happy sewing...until tomorrow!
Melodee